
Photos are a great way to show off the exciting things your organization has done! Your gallery photos will be showcased at the top of your organization’s public-facing page. Note: To add photos to an organization’s site, a user must hold a position that has “Photo – Full” access.
Uploading Photos

To add photos to your organization’s gallery, follow these steps:
- Go to the Action Center for your organization by clicking on your Switchboard and selecting Manage.
- Open your organization tool drawer and select Gallery.
- Select Create New Album. Enter a name for the album and a brief description. Indicate who can view the photo album based on their position. Click Create Album. If you are wanting to add photos to an existing album, you can bypass this step!
- Click on the title of the album.
- Click “Add Photos”.
- Select the file(s) from a saved location and include a caption. (you may also drag and drop multiple images from your desktop into the upload area. This feature is dependent on specific technology in modern browsers, your browser may not support drag and drop.
- Click Upload All.
Setting Featured Photos
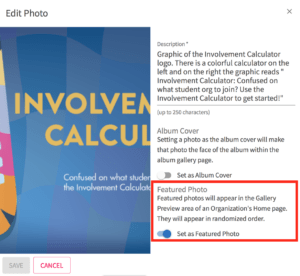
Once you have uploaded photos to your gallery, you can select which photos will be featured on your organization’s homepage. You can feature any number of photos you want, and they will randomize in a collage format. To feature a photo, select the “Edit Photo” button and then check the box next to “Set as Featured Photo.”
Updating Albums
Locate the album to update and click Edit Album in the top-right corner. Update the name, description, and access to the phone album. Click Save to make your changes.
Removing Photos and Albums
To remove a photo or an album, hover over the item to be deleted. Click the trash can icon in the top right hand corner and confirm your deletion.